
Choosing the right mobility aid isn’t about the device itself; it’s about matching its features to your specific body and environment to prevent costly errors and ensure safety.
- Large wheels (8 inches or more) are non-negotiable for safely navigating outdoor terrain like cracked sidewalks and grass.
- Push-down brakes are an essential safety feature for users with arthritis or weak grip strength, as they engage with body weight instead of hand power.
Recommendation: Prioritize a lightweight carbon fiber or aluminum model (typically 11-18 lbs) if you need to lift the device into a car by yourself.
Choosing a mobility aid is one of the most significant decisions a senior can make for maintaining independence. Too often, the choice between a standard walker and a rollator is oversimplified. People focus on the basic idea that walkers offer stability while rollators provide mobility, but this surface-level understanding leads to common and frustrating purchasing mistakes. An ill-suited device can result in a loss of confidence, an inability to navigate your own community, or even a risk of falling. This isn’t just about buying a product; it’s about making a long-term investment in your freedom and safety.
The conventional wisdom about checking handle height and wheel size is a starting point, but it’s not enough. Have you considered how your grip strength affects brake safety? Or how the device’s material impacts your ability to leave the house? The key to a successful choice is not just looking at the device’s features, but diagnosing your personal environment and biomechanics. This guide moves beyond the basics. We will analyze the critical details—from brake mechanisms and wheel physics to seat ergonomics and material science—to help you select a mobility partner that truly matches your life, preventing the costly mismatches that keep so many seniors stuck at home.
This article provides a specialist’s perspective on making the right choice. By breaking down the most important features and common pitfalls, this guide will empower you to select a device that enhances your mobility and confidence for years to come.
Summary: Choosing the Right Walker or Rollator for Your Strength and Terrain
- Why Push-Down Brakes Are Safer for Seniors With Arthritis?
- Small Wheels vs. Large Wheels: Which Handles Cracked Sidewalks?
- How to Measure Rollator Seat Height to Prevent Hip Strain?
- The Mistake of Buying a Walker Too Heavy to Lift Into a Car
- When to Replace Walker Glides Before They Ruin Floors?
- Starting Low-Impact Fitness Routines After a Sedentary Decade
- Navigating Uneven Community Environments With Limited Mobility
- Navigating Uneven Community Environments With Limited Mobility
Why Push-Down Brakes Are Safer for Seniors With Arthritis?
For many seniors, hand strength is a significant barrier. Arthritis, neuropathy, or general weakness can make squeezing a traditional loop-style brake painful and unreliable. This is a critical safety issue, as effective braking is essential for controlling speed on slopes and for securely parking the rollator before sitting. With osteoarthritis being a prevalent condition, where research shows 40-76% of adults with the condition rely on assistive walking devices, choosing the right brake system is not a minor detail—it’s a core component of a proper biomechanical match.
This is where push-down brakes, also known as weight-activated brakes, become a superior solution. Instead of requiring finger and grip strength to pull a lever, these brakes engage when the user applies downward pressure on the handles. This simple shift in mechanics leverages body weight, a much more reliable and less painful force for someone with hand dexterity issues. It transforms the act of braking from a painful squeeze to a natural, stabilizing motion.
The advantages for users with arthritis are clear and direct:
- No Grip Strength Needed: Brakes are engaged by applying body weight, eliminating the need for painful squeezing motions that aggravate arthritic joints.
- Automatic Engagement: The brakes engage automatically when you put pressure on the handles to stop or sit, providing an intuitive safety net.
- Distributed Force: Braking force is distributed across the entire palm and through the arm, rather than being concentrated in sensitive finger joints.
- Increased Confidence: Knowing you can stop securely and without pain provides the confidence needed to venture out, especially on uneven or sloped terrain.
From a specialist’s perspective, recommending a rollator with loop brakes to a client with significant arthritis is a classic example of a costly mismatch. The device may seem fine in the store, but in the real world, it becomes a source of pain and a potential safety hazard.
Small Wheels vs. Large Wheels: Which Handles Cracked Sidewalks?
One of the most common mistakes in selecting a rollator is underestimating the importance of wheel size. This isn’t just a minor feature; it is the single most critical factor in determining where you can safely travel. An environmental diagnosis of your typical surroundings is essential. If your goal is to walk outdoors—on sidewalks, park paths, or across lawns—then large wheels are not just a preference, they are a necessity. Small wheels, typically 4-6 inches in diameter, are designed for smooth indoor surfaces and will catch on the smallest crack or pebble, creating a jarring stop and a serious tipping hazard.
To navigate the variable terrain of the real world, you need wheels that can roll over imperfections rather than being stopped by them. A wheel with a diameter of 8 inches or more has a better “angle of attack,” allowing it to smoothly climb over obstacles like cracked sidewalks, door thresholds, and grassy patches. This is the difference between a pleasant walk in the neighborhood and a frustrating, dangerous trip.
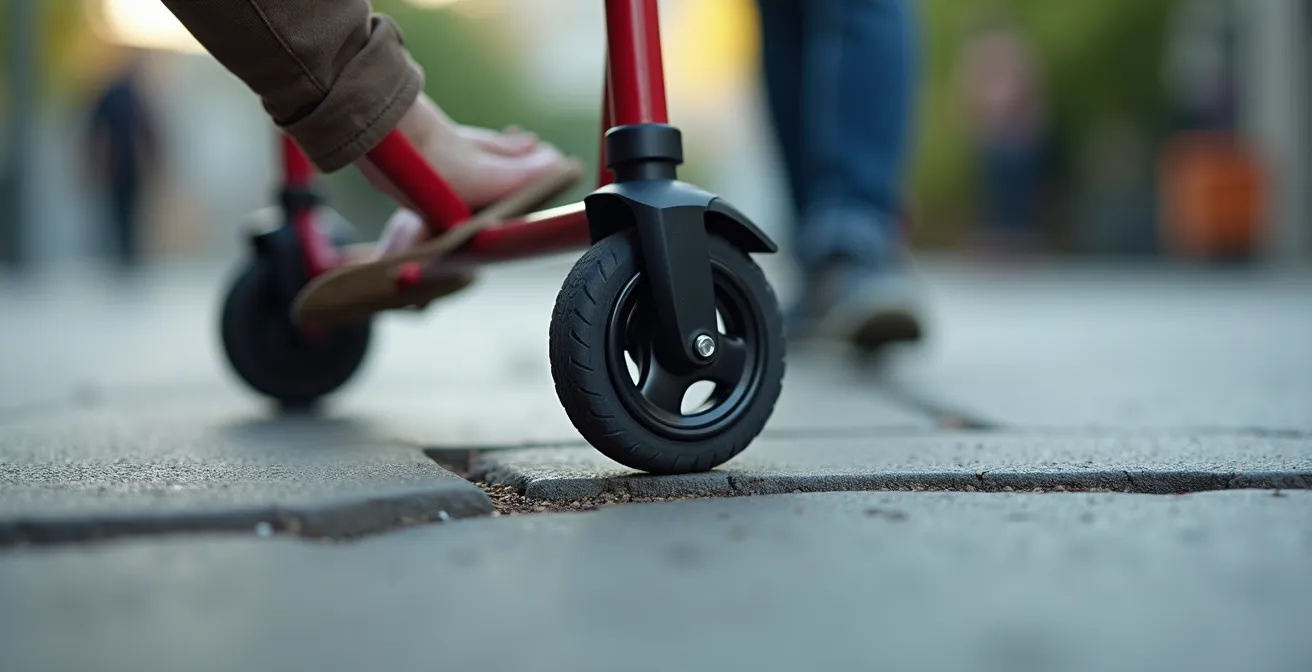
As the image above illustrates, a larger wheel makes contact with the edge of a crack at a higher point, allowing forward momentum to lift the wheel over it. A small wheel hits the crack like a wall. This simple physics is the key to outdoor mobility and confidence. For anyone who is unsteady on their feet, the stability provided by large wheels is paramount.
This comparative table breaks down the capabilities of different wheel sizes, making the choice clear.
| Wheel Size | Best For | Terrain Capability | Maneuverability |
|---|---|---|---|
| 4-6 inches | Indoor use, smooth surfaces | Level ground only | Excellent in tight spaces |
| 8 inches | Mixed indoor/outdoor | Handles moderate terrain | Good balance |
| 10+ inches | Outdoor use | Rough terrain, cracks, grass | Requires more space |
Therefore, a specialist’s advice is unequivocal: if you plan to leave your home, do not consider a rollator with wheels smaller than 8 inches. It’s the most important decision you’ll make for ensuring safe and enjoyable mobility in your community.
How to Measure Rollator Seat Height to Prevent Hip Strain?
While handle height is often discussed, rollator seat height is a frequently overlooked ergonomic factor that has a major impact on user safety and comfort. A seat that is too low or too high can cause significant strain on the hips and knees, particularly during the sit-to-stand motion. For seniors, who may already have hip or joint issues, getting this measurement right is crucial for preventing injury and promoting long-term use. A proper biomechanical match ensures that the rollator’s seat serves as a safe resting place, not an additional physical challenge.
The goal is to find a height that allows you to sit down and stand up with minimal effort, using the rollator handles for stable support. Your knees should be at a roughly 90-degree angle when seated, with your feet flat on the floor. If the seat is too high, your feet may dangle, creating instability. If it’s too low, you’ll have to use excessive force from your legs and back to stand up, which can lead to strain and increase the risk of a fall.
Follow this step-by-step process to ensure both the handle and seat height are correctly configured for your body. You will need another person to help you take the measurement.
- Wear your everyday walking shoes and stand straight with your arms relaxed at your sides.
- Have someone measure from the floor to the crease of your wrist. This measurement is the ideal height for the rollator’s handgrips.
- When you place your hands on the grips set to this height, your elbows should have a comfortable bend of about 15 to 20 degrees.
- Next, adjust the seat height. Sit on the seat and check that your feet are flat on the floor with your knees bent at a 90-degree angle or slightly more.
- Test the sit-to-stand motion. You should be able to push up from the seat using the handles for support without feeling excessive strain on your hips or knees.
Never assume the factory setting is right for you. Personalizing the fit is what transforms a generic device into a true extension of your body, providing security and preventing the kind of chronic strain that can limit your mobility over time.
The Mistake of Buying a Walker Too Heavy to Lift Into a Car
A rollator can be a gateway to freedom, but that freedom ends at the curb if the device is too heavy to lift into a car. This is one of the most common and disappointing “costly mismatches” we see as specialists. A user finds the perfect rollator for walking, only to realize they can’t take it anywhere without assistance because its weight makes it impossible to manage alone. This single factor can severely limit a person’s independence, defeating the very purpose of the mobility aid.
The weight of a rollator is determined primarily by its material. While heavy-duty steel models offer maximum durability, they are often impractical for transportation. According to industry specifications, typical aluminum rollators weigh between 15-18 lbs, while premium, lightweight models can be as little as 11-14 lbs. This difference of a few pounds can be the deciding factor in whether you can independently run errands, visit friends, or go to appointments.

Before purchasing, you must honestly assess your own lifting capacity. If possible, practice folding and lifting the exact model you are considering. A device should feel manageable, not like a struggle. As demonstrated above, using proper lifting technique—bending at the knees and keeping the object close to your body—is essential, but technique alone cannot compensate for a device that is simply too heavy.
This table compares common rollator materials, highlighting the trade-offs between weight, durability, and cost.
| Material | Weight Range | Durability | Price Point | Best For |
|---|---|---|---|---|
| Steel | 20-30 lbs | Very High | Budget | Home use only |
| Aluminum | 11-18 lbs | High | Mid-range | Standard daily use |
| Carbon Fiber | 10-13 lbs | Very High | Premium | Frequent car transport |
For users who drive and want to maintain an active, independent lifestyle, investing in a lightweight aluminum or carbon fiber model is almost always the correct choice. The higher initial cost is easily justified by the daily freedom it provides.
When to Replace Walker Glides Before They Ruin Floors?
For users of standard walkers (without wheels), the small plastic glides on the rear legs are critical wear-and-tear items. They are designed to slide smoothly over surfaces, but once they wear down, they can cause serious and expensive damage to indoor flooring. A worn glide can expose a sharp plastic edge or even the metal leg of the walker, which will scratch and gouge hardwood, vinyl, and laminate floors with every step. Ignoring this small maintenance task is a costly mistake.
The key is proactive inspection. You shouldn’t wait until you hear a horrible scraping sound or see a long scratch across your kitchen floor. Walker glides are inexpensive and easy to replace, and checking them should be part of a regular weekly routine. Different glide types are suited for different floors; for instance, smooth plastic glides work well on carpet but can be noisy on hardwood, where felt-bottom glides are a quieter and safer option. Using the wrong type of glide for your environment can accelerate wear and increase the risk of floor damage.
An environmental diagnosis of your home flooring is step one. Step two is regular inspection. This simple checklist provides a clear, actionable plan for monitoring the condition of your walker glides to protect your floors.
Your 5-Point Walker Glide Inspection Checklist
- Perform the ‘fingernail test’: Run your fingernail across the bottom surface of the glide. If you feel deep scratches, grooves, or a rough texture, it’s time for replacement.
- Listen for auditory cues: As you walk, listen for any harsh scraping or grinding sounds. A healthy glide should move quietly across the floor.
- Visually check for wear: Look for flattened edges, visible thin spots, or a change in the shape of the glide. Uneven wear can also indicate that the walker frame may be bent or misaligned.
- Inspect for embedded debris: Small rocks or grit can get embedded in the plastic. Check for and remove any debris that could act like sandpaper on your floors.
- Test the glide movement: The walker should slide with minimal friction. If you feel you have to push harder than usual or the walker “catches,” the glides are likely worn out.
Ultimately, treating walker glides as a consumable part, much like the tires on a car, is the correct mindset. A few dollars spent on new glides every few months is a wise investment to prevent hundreds or even thousands of dollars in floor repairs.
Starting Low-Impact Fitness Routines After a Sedentary Decade
After a period of being sedentary, the idea of starting a fitness routine can be intimidating. However, a rollator is more than just a walking aid; it’s an exceptional piece of fitness equipment that provides the stability needed to safely reintroduce activity into your life. Using a rollator allows you to exercise with confidence, knowing you have support to prevent falls and a seat for rest whenever you need it. This reduces the fear of over-exertion and injury, which are major barriers for many seniors.
The benefit of using a rollator for exercise is that it promotes a more natural gait and posture compared to a standard walker, which often encourages hunching over. This better posture and smoother movement help conserve energy, allowing you to walk for longer periods. In fact, research indicates that rollators can significantly improve walking performance in terms of distance, pace, and speed. This concept of “energy economy” is vital; by making movement more efficient, a rollator enables you to build endurance gradually and sustainably.
A structured, gentle approach is key. Don’t try to do too much too soon. The goal is consistency, not intensity. This simple weekly progression plan uses a rollator to safely build strength and stamina.
- Week 1: Walk to the end of your driveway and back. Aim to do this twice a day, using the rollator for support.
- Week 2: Extend your walk to the next house and back, maintaining your twice-daily routine.
- Week 3: Attempt a walk around the block. Lock the brakes and take a seated rest on your rollator about halfway through.
- Week 4: While seated on your locked rollator, add seated leg extensions. Slowly extend one leg straight out, hold for a moment, and lower it. Do 10 repetitions per leg.
- Week 5: Incorporate standing calf raises. Hold onto the rollator handles for balance, and slowly raise up onto your toes and lower back down. Aim for 2 sets of 10 repetitions.
- Week 6: With the rollator locked securely behind you for safety, add gentle mini-squats. Hold the handles, and bend your knees slightly as if sitting in a chair.
By starting small and gradually increasing the duration and complexity of your movements, you can use your rollator to safely overcome a sedentary past and build a foundation for a healthier, more active future.
Navigating Uneven Community Environments With Limited Mobility
Owning the perfect rollator is only half the battle. The other half is developing the skills to use it effectively in the challenging, uneven environments of the real world. Sidewalks are not always perfectly level, doors have thresholds, and curbs are a constant presence. Mastering the techniques to navigate these obstacles is what truly unlocks the freedom a mobility aid promises. It’s about transforming the device from a simple support into a capable tool for community engagement.
The most common and intimidating obstacle is a curb. Many users try to lift the entire rollator at once, which is unstable and dangerous, or they approach it at an angle, risking a tip-over. The correct technique involves breaking the process down into a series of safe, manageable steps that leverage the rollator for stability at every stage. This method ensures you are always in control and supported.
This curb navigation technique should be practiced on a small, safe curb until it becomes second nature:
- Approach Head-On: Always approach the curb directly, at a 90-degree perpendicular angle. This is the most stable position.
- Lift the Front: Push down on the handles to apply pressure on the rear wheels. This will act as a lever, lifting the front wheels slightly. Place the front wheels onto the curb.
- Roll Forward: Roll the device forward until the rear wheels are flush against the curb edge.
- Lock the Brakes: Before you attempt to step up, engage the brakes securely. The rollator is now a fixed, stable grab bar.
- Step Up: Holding the handles for support, step up onto the curb with your stronger leg first. Bring your other leg up to join it.
- Release and Proceed: Once you are stable on the curb, release the brakes and continue on your way.
The same principles apply to other obstacles. For steep ramps, zig-zagging slightly can reduce the perceived incline. For grassy areas, keeping your momentum steady is key. Each environment has its own challenges, but with the right technique, they can all be overcome safely.
Key Takeaways
- Match your device to your life: Prioritize large (8″+) wheels for outdoors and lightweight (under 18 lbs) models for car transport.
- Prioritize safety for your body: Choose push-down brakes for arthritic hands and always measure for correct seat height to prevent hip strain.
- Maintenance matters: Regularly inspect walker glides to prevent costly floor damage and ensure smooth, safe movement indoors.
Navigating Uneven Community Environments With Limited Mobility
Ultimately, a mobility aid is not just a medical device; it becomes a partner in your daily life. The journey from cautiously using it at home to confidently navigating your community is one of both physical skill and mental adaptation. Moving beyond the technical specifications, the true success of a walker or rollator lies in how well it integrates into your lifestyle and boosts your confidence to participate in the activities you love. It’s about seeing it not as a limitation, but as an enabler.
This means cultivating a proactive mindset. It involves performing the regular maintenance checks, like inspecting your walker glides, not as a chore, but as a way of caring for your partner in mobility. It means practicing skills like curb navigation until they are automatic, transforming sources of anxiety into minor, manageable tasks. The goal is to build a level of trust with your device so that you can focus on your destination—the park, the store, a friend’s house—rather than on the mechanics of getting there.
By making an informed choice based on a thorough diagnosis of your environment and your body, you lay the foundation for this partnership. A device that fits your life correctly will feel less like an accessory and more like a natural extension of yourself. This synergy is what allows you to conserve energy, walk with a healthier posture, and, most importantly, feel secure enough to set new goals for yourself, whether it’s starting a gentle fitness routine or simply taking a longer walk on a sunny day.
Your walker or rollator is a powerful tool. By choosing wisely and committing to learning its use, you can move beyond simply managing mobility challenges and start actively expanding the boundaries of your world once again. The next step is to evaluate your own needs and environment with this new perspective.