In summary:
- Transform your kitchen from an obstacle course into a high-performance “culinary cockpit” designed for the seated chef.
- Prioritize an ergonomic layout with work zones over the traditional triangle to dramatically reduce movement and conserve energy.
- Select appliances and storage based on their “energy spoon” cost, choosing solutions that eliminate bending and reaching.
- Focus on safety and efficiency with features like induction cooktops and accessible knee space under sinks and prep areas.
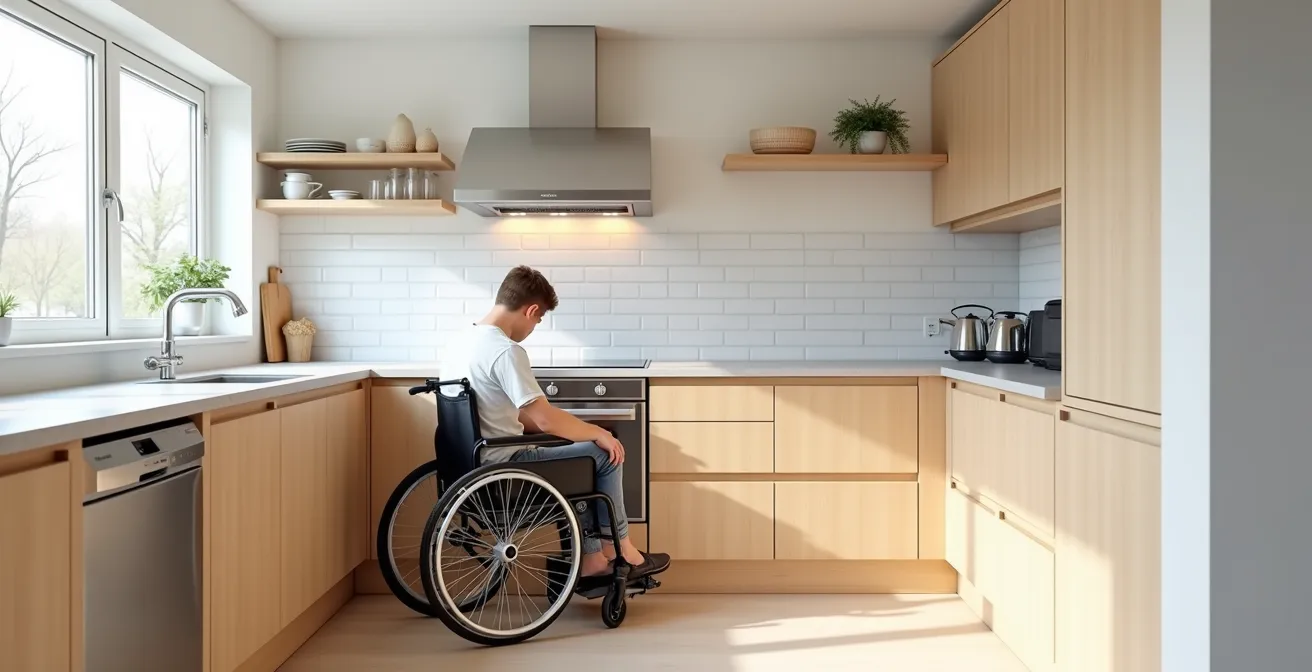
For any passionate cook, the kitchen is a sanctuary. It’s a place of creation, comfort, and joy. But when mobility changes, that sanctuary can quickly become a source of frustration and fatigue. Standard kitchen design, with its high cabinets, low ovens, and fixed layouts, is inherently hostile to anyone who can’t stand for long periods. The joy of simmering a sauce or chopping fresh vegetables is replaced by the strain of reaching, the danger of carrying hot pots, and the exhaustion of navigating an inefficient space.
The conventional advice often stops at “lower the counters” or “follow ADA guidelines.” While these are starting points, they miss the soul of the issue. They treat the kitchen as a space for mere function, not for passion. They fail to address the core problem: the constant drain of precious energy on tasks that should be effortless. This energy, which many in the chronic illness community refer to as “energy spoons,” is a finite daily resource. A poorly designed kitchen can consume all your spoons before you’ve even started cooking.
The true key to unlocking the kitchen for a seated chef isn’t just about accessibility; it’s about radical ergonomic efficiency. This guide reframes the challenge: instead of just making the kitchen usable, we will design a high-performance culinary cockpit. The goal is to eliminate ergonomic friction at every turn, preserving your energy not just for preparing a meal, but for truly enjoying the art of cooking itself. We’ll explore how to reorganize your space, choose the right appliances, and modify key areas to create a kitchen that works for you, not against you.
This article will guide you through the essential strategic shifts required to build your personal culinary cockpit. We will dissect common design flaws and present innovative, practical solutions that prioritize your energy and safety, ultimately helping you reclaim your kitchen and your love for cooking.
Summary: The Seated Chef: Designing a High-Performance Kitchen for Cooking from a Wheelchair
- Why Standard Upper Cabinets Are Obsolete for Aging in Place?
- How to Create a “Knee Space” Under the Sink Without Full Demolition?
- Drawer Dishwashers vs. Drop-Down Doors: Which Is Back-Friendly?
- The Mistake of Using Gas Cooktops With Loose Sleeves
- How to Reorganize the Kitchen Work Triangle to Reduce Steps by 50%?
- How to Fortify Soups and Smoothies With Hidden Proteins?
- Modifying Daily Activities to Preserve “Energy Spoons”
- Creating Nutrient-Dense Meal Plans for Seniors with Low Appetite
Why Standard Upper Cabinets Are Obsolete for Aging in Place?
Standard upper cabinets are perhaps the most glaring example of ergonomic friction in a conventional kitchen. Installed 54 inches from the floor, they are fundamentally incompatible with a seated user’s reach. For a passionate cook, this isn’t just an inconvenience; it’s a barrier to creativity and a significant safety hazard. Relying on reaching aids is slow, and attempting to reach upward can lead to instability and dropped items. This constant, frustrating struggle drains valuable energy spoons for a simple task like retrieving a spice jar.
The solution lies in abandoning this outdated vertical storage model in favor of accessible, lower-level alternatives. The goal is to bring everything within a comfortable and safe “strike zone.” In fact, ergonomic research shows that the vast majority of wheelchair users can comfortably reach shelves positioned between 20 to 44 inches from the floor. This completely redefines where primary storage should be located. Instead of reaching up, the seated chef should be able to access everything with a simple pull or a slide.
Effective replacements include full-extension drawers in base cabinets, pull-down shelving systems that bring the contents of an upper cabinet down to counter height, and open shelving installed at a lower, accessible level. By eliminating the need for upward reaching, you not only make the kitchen safer but also create a more fluid and efficient workflow. Every plate, pan, and pantry item becomes immediately available, turning your kitchen into a true culinary cockpit where every tool is at your fingertips, preserving your energy for the craft of cooking itself.
How to Create a “Knee Space” Under the Sink Without Full Demolition?
A “roll-under” sink with dedicated knee space is non-negotiable in an ergonomic kitchen for a seated chef. It transforms one of the most prolonged tasks—washing dishes or prepping vegetables—from a strained, side-saddle affair into a comfortable, forward-facing activity. Without this space, the user is forced to twist their torso and reach sideways, creating significant back and shoulder strain. This constant discomfort is a major source of ergonomic friction, draining energy that could be better spent on the enjoyable parts of cooking.
Creating this space doesn’t always require a full gut renovation. For existing cabinetry, a skilled contractor can often remove the doors and central stile of a standard sink base cabinet, reinforce the structure, and create an open bay. The key is ensuring the resulting space meets functional and safety standards. To provide adequate clearance, ADA guidelines specify that kitchen sinks must provide at least 29 inches of height, 11 inches of depth, and 30 inches of width for knee space. This allows the user to get close to the basin without obstruction.
The plumbing is a critical component of this modification. Hot water pipes must be insulated or covered to prevent accidental burns on the user’s legs. A shallower sink basin (around 5-6 inches deep) is also preferable, as it reduces the forward lean needed to reach the bottom. Finally, a single-lever faucet or a touchless model makes operation effortless with one hand.
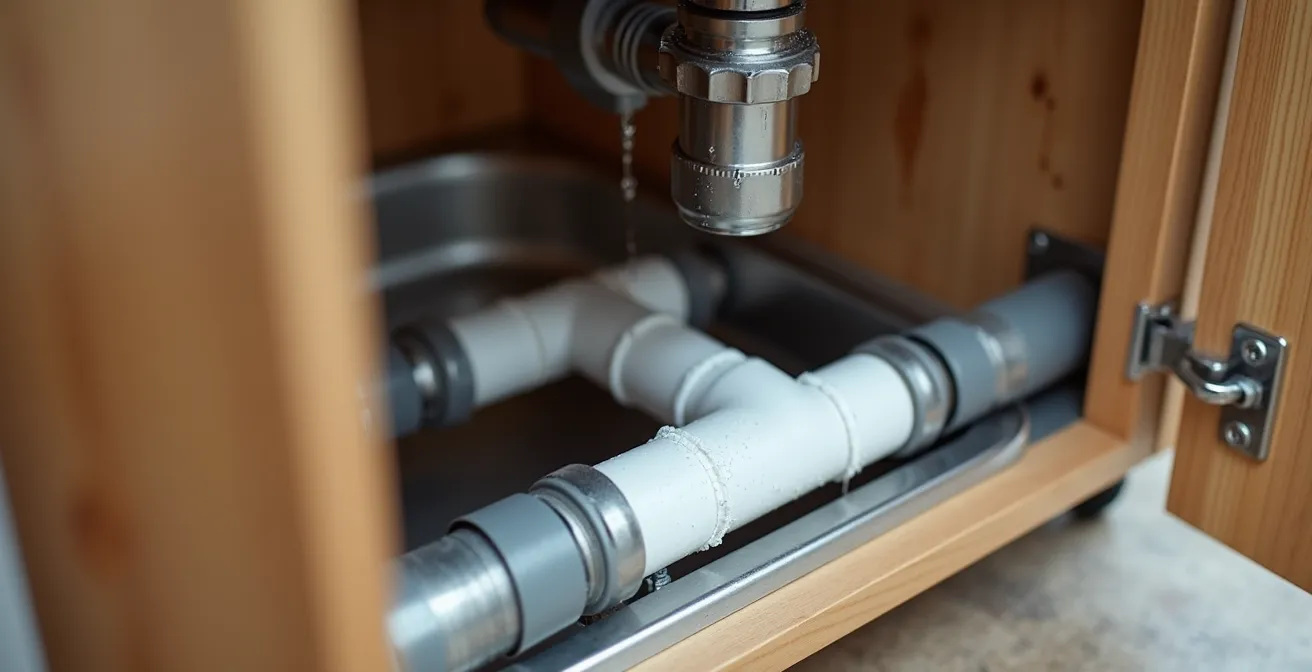
As this image demonstrates, the design prioritizes safety and function. The insulated pipes are clearly visible, protecting the user, while the open space allows for direct, comfortable access to the basin and faucet. This single modification can turn a point of pain into a zone of comfort and efficiency in the culinary cockpit.
Drawer Dishwashers vs. Drop-Down Doors: Which Is Back-Friendly?
The dishwasher, a tool of convenience, can become a significant source of strain in a non-adapted kitchen. A traditional drop-down door model forces a seated user to lean far forward over the open door to load and unload racks, particularly the one at the back. This action places considerable stress on the lumbar spine and requires a long, awkward reach, costing precious energy spoons with every use. For the seated chef, this daily chore can become a dreaded, painful task.
Drawer dishwashers, on the other hand, represent a major ergonomic leap forward. Positioned at waist height, they slide out like a standard drawer, bringing the rack directly to the user. This eliminates the need to bend or lean over a door. The reach is shorter, the posture is more upright and stable, and the entire process is significantly less taxing on the body. While a single drawer holds a smaller load, double-drawer models offer the same capacity as a standard machine, with the added flexibility of running small, efficient loads.
The ergonomic difference is not subtle; it’s a game-changer for daily energy management. As a comparative analysis of appliance ergonomics shows, the choice directly impacts physical strain and energy expenditure.
| Feature | Drawer Dishwasher | Drop-Down Door |
|---|---|---|
| Loading Position | Waist height, minimal bending | Requires leaning over door |
| Reach Distance | 12-16 inches | 24+ inches to back rack |
| Lumbar Strain | Minimal | Significant forward lean |
| Energy Spoons Cost | 2-3 per load | 5-7 per load |
For households with multiple users of varying heights, a clever compromise exists. Some designers have successfully implemented solutions by raising a standard drop-down dishwasher 6-8 inches off the floor on a platform. This simple modification reduces the bending required for all users and makes the bottom rack more accessible from a seated position, offering a hybrid solution when a drawer model isn’t feasible.
The Mistake of Using Gas Cooktops With Loose Sleeves
For a seated chef, a gas cooktop is not just inefficient; it’s a significant safety risk. The primary danger comes from the open flame. Loose-fitting sleeves or flowing clothing can easily brush against a burner and catch fire. Furthermore, reaching over one lit burner to tend to a pot on a back burner is a perilous maneuver from a seated position. The heavy iron grates also create an uneven surface, making it difficult and dangerous to slide heavy pots—they must be lifted, which increases the risk of spills and burns.
The superior alternative is an induction cooktop. This technology is a cornerstone of the modern culinary cockpit for its unparalleled safety and efficiency. Induction cooking uses magnetic fields to heat the pan directly, not the cooktop surface. This means the surrounding glass surface remains cool to the touch, virtually eliminating the risk of accidental burns from brushing against it. If a pot is removed, the power to that zone automatically shuts off, preventing forgotten “burners” from being left on.
This technology also provides a completely smooth, flat surface. Heavy pots filled with water or sauce can be slid effortlessly from one spot to another without any lifting. This reduces strain and minimizes the risk of spills. Beyond safety, induction offers superior cooking performance with faster heating and more precise temperature control than gas, and modern induction cooktops achieve up to 84% energy conversion efficiency, making them a more sustainable choice.

The image of a seated cook confidently and safely managing a meal on an induction cooktop highlights the calm control this technology provides. The absence of open flames and the presence of front-mounted controls create a secure and empowering cooking environment, allowing the chef to focus on their culinary craft without fear or physical strain.
How to Reorganize the Kitchen Work Triangle to Reduce Steps by 50%?
The classic “kitchen work triangle”—the conceptual path between the sink, refrigerator, and stove—was designed for a standing person who could pivot and take a few steps. For a seated chef, this model is fundamentally broken. Wheeling between three distant points, often carrying ingredients or hot pans, is inefficient, exhausting, and dangerous. It creates excessive “travel time” within the kitchen, consuming a huge number of energy spoons before the real cooking even begins. This is the epitome of poor movement economy.
To create a truly high-performance culinary cockpit, the triangle must be dismantled in favor of a linear or zoned system. The goal is to consolidate tasks and minimize movement. The most efficient layout places the primary work areas—the sink, the main prep counter, and the cooktop—along a single, continuous, and accessible countertop. This allows the seated chef to slide items from the washing area to the prep area to the cooking area without ever needing to wheel across the room.
Case Study: Linear Work Zone Implementation
A successful redesign by KCBR for a wheelchair user replaced the traditional work triangle with a linear zone system. By placing the sink and cooktop on the same wall with continuous counter space between them, they completely eliminated the need to carry heavy pots across the room. As a result, this redesign reduced movement by approximately 50% and minimized dangerous twisting motions, preserving the user’s energy and enhancing safety.
Organizing these zones logically is the final step. By thinking in terms of workflow—from cleaning to prep to cooking—you can create an assembly line perfectly tailored to your needs. This systematic approach transforms the kitchen from a series of disconnected points into a single, cohesive, and highly efficient workstation.
Your Action Plan: The 3-Zone Kitchen for Maximum Efficiency
- Create a Cleaning Zone: Position the dishwasher (ideally a drawer model) directly adjacent to the roll-under sink. Store everyday dishes and cutlery in deep drawers immediately below or next to this area to minimize movement after washing.
- Establish a Prep Zone: This is the heart of your cockpit. Install a continuous, lowered countertop (32-34 inches high) with knee space between the sink and the cooktop. Integrate a pull-out cutting board and position trash/compost bins on wheels to roll into this space.
- Design a Cooking Zone: Place your induction cooktop at one end of the linear counter. Position a microwave drawer and a side-swing wall oven nearby at a consistent, accessible height. Store pots, pans, and cooking utensils in the base cabinet drawers directly below the cooktop.
How to Fortify Soups and Smoothies With Hidden Proteins?
For seniors who may have a low appetite or difficulty with chewing, nutrient-dense liquids like soups and smoothies are a nutritional lifeline. The challenge, however, is ensuring these meals are adequately fortified with protein and other essential nutrients to prevent sarcopenia (age-related muscle loss) and maintain energy levels. Simply blending fruit is not enough. The key is to seamlessly integrate “hidden” sources of protein and healthy fats that don’t compromise taste or texture.
Excellent, easily blendable protein boosters include unflavored collagen peptides, whey or plant-based protein powder, silken tofu, Greek yogurt, and even cottage cheese. For healthy fats and fiber, consider adding avocado, nut butters, chia seeds, or flax seeds. For soups, pureed white beans or lentils can be stirred in to add creaminess, fiber, and a substantial protein kick without altering the primary flavor. Keeping these boosters readily available is crucial for consistency.
From an ergonomic standpoint, the setup for preparing these fortified meals must be as frictionless as the ingredients themselves. The blender, food processor, and all fortification ingredients should live within the primary “culinary cockpit” zone. Having to retrieve a heavy blender from a low cabinet or a protein canister from a high shelf adds a barrier to daily nutrition. The easier it is to make a healthy choice, the more likely it is to happen.
Smart Storage Solution for Nutritional Supplements
To address this exact issue, Wren Kitchens developed an innovative pull-out spice rack system specifically adapted for nutritional supplements. Positioned in base cabinets at an accessible height, these narrow, multi-tiered racks provide seated users with immediate visual and physical access to protein powders, vitamins, and other meal fortification ingredients. This small design change makes achieving daily nutrition goals effortless and strain-free.
Modifying Daily Activities to Preserve “Energy Spoons”
The concept of “energy spoons” is a powerful metaphor for managing daily life with limited physical stamina. Every person starts the day with a certain number of spoons, and every activity—from getting dressed to making coffee—costs one or more. A poorly designed kitchen is a spoon thief, demanding far too much energy for basic tasks. The goal of a high-performance culinary cockpit is to drastically reduce the spoon cost of every kitchen activity, leaving you with more energy for the creative and enjoyable aspects of cooking.
Every element of the kitchen can be analyzed through this lens. For example, carrying a heavy pot of water from the sink to the stove costs several spoons and poses a spill risk. Installing a pot-filler faucet over the cooktop reduces that cost to a single, effortless spoon. Bending down to pull open a heavy, hot oven door is a high-cost activity. A side-swing wall oven, mounted at the correct height, makes access nearly effortless.
As expert home remodeler Katie Finn of Patrick A. Finn Custom Homes and Remodeling suggests, small upgrades can yield significant energy savings. Her advice emphasizes reducing strain at every touchpoint:
Consider treating yourself to a hands-free faucet with an anti-scald device. Automated soap dispensers and sinks with narrower and shallower basins are also a good way to prevent back pain from leaning over too far
– Katie Finn, Patrick A. Finn Custom Homes and Remodeling
The cumulative effect of these modifications is profound. By systematically identifying and redesigning high-cost tasks, you can reclaim a significant amount of your daily energy. The following analysis quantifies just how dramatic these savings can be.
| Kitchen Task | Standard Design (Spoons) | Adaptive Design (Spoons) | Energy Saved |
|---|---|---|---|
| Getting water | 4 (reach up, carry pitcher) | 1 (pot-filler faucet) | 75% |
| Opening oven | 5 (bend, pull down door) | 2 (side-swing door) | 60% |
| Washing dishes | 6 (standing, reaching) | 3 (roll-under sink) | 50% |
| Retrieving pans | 4 (bend to cabinet) | 1 (drawer storage) | 75% |
Key Takeaways
- The “Energy Spoon” theory is a critical framework for kitchen design; every choice should aim to reduce the energy cost of a task.
- A linear, zone-based layout (Cleaning, Prep, Cooking) is ergonomically superior to the traditional work triangle for a seated user.
- Prioritize storage within the 20-to-44-inch height range, utilizing drawers, pull-outs, and low shelving instead of standard upper cabinets.
From Accessible Design to Daily Nourishment: The Final Piece of the Puzzle
Ultimately, a brilliantly designed kitchen is only successful if it enables a healthier and more joyful life. For many seniors, maintaining good nutrition can be a challenge due to a low appetite or the sheer effort involved in meal preparation. The principles of the culinary cockpit directly address this. By making every step of the cooking process easier, safer, and less tiring, an ergonomic kitchen lowers the barrier to preparing fresh, nutrient-dense meals.
The goal is to make healthy eating the path of least resistance. This involves strategic placement of not just tools, but also ingredients. A small, counter-height mini-fridge with a clear front can be stocked with grab-and-go healthy snacks like yogurt, fruit, and cheese. Low, easy-open drawers can house nuts, dried fruits, and protein bars. A microwave drawer, installed in a base cabinet, makes reheating small, frequent meals effortless, which is often a better strategy for those with low appetite than preparing three large meals.
Of course, undertaking such a remodel is a significant investment. While small modifications can be made affordably, a comprehensive overhaul requires a budget. It’s important to approach this with realistic expectations; a 2021 market analysis showed that creating an accessible kitchen in the U.S. typically costs between $10,000 to $50,000, depending on the scope of the project. However, this investment should be weighed against the immense quality-of-life improvements: greater independence, improved safety, better nutrition, and the priceless return of a beloved passion.
By integrating smart storage for nutritious foods into an ergonomically flawless design, the kitchen transforms from a simple workspace into a holistic wellness hub. It becomes a space that not only allows you to cook, but actively encourages and supports your health and well-being every single day.
By applying these principles, you can transform your kitchen from a source of daily struggle into your personal culinary sanctuary. The next logical step is to begin assessing your own space, identifying the biggest sources of ergonomic friction, and planning for modifications that will bring the joy back to your cooking.